Universal
Focusing Bellows
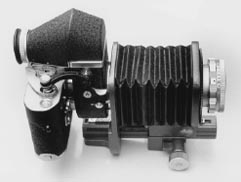
This
is the Visoflex II, OTXBO magnifier, 65/3.5 Elmar with Bellows II on an M3.
To see Roy Moss' article on the 65mm Elmar, please visit the LHSA 'Viewfinder'
article by clicking on the photo.
My very large thanks to Roy Moss for permission to use this image.
Here
begins the odyssey of finding out about the Universal Focusing Bellows. Pretty
much since the beginning of the Leica rangefinder, Leica have provided some
sort of device for copying or using the camera for macro work. This also includes
what could be thought of as the origins of the Over-Head Projector: The X-Ray
Reproduction Apparatus from 1936. Check it out in one of the old Hove reproductions
of the Leica General Catalogue, it's something to behold.
Ahem,
excuse the segue. The Universal Copying Device is also listed for availability
in 1936 and, to quote from the catalogue...
A
basic setup [GROOW] would cost 18 U.K. pounds. A more than basic setup [REOOD]
would cost you 45 U.K. pounds. <sigh>.
Of course, with the addition of a microscope to the setup, you could increase
this magnification to whatever your microscope was able to deliver.
I should note here that if you are at all interested in the scientific applications
of the Leica, you should start with Heinrich Stockler's book 'The Leica in
Professional Practice', Fountain Press: London, 1954. However, you should
be warned, some of the photographic content is very disturbing.
Adapters
The
earliest version of the modern incarnation of the Universal Focusing Bellows
I have found is listed from 1951, the UXOOR, which came with an adapter for
the 135 Hektor. With the addition of a UYCOO bayonet adapter you could also
use the bellows with a 50 Elmar. The following adapters were also available
between1951 and 1960.
| UOOND |
Adapter
for fitting screwmount lenses on the bellows |
1956 |
| UOORF |
Adapter
for using both the Summicron 50/2 and the Near-Focusing
Summicron 50/2 (SOSIC and SOMNI) |
1960 |
| UOOXI |
Adapter
for the 125 Hektor |
1956 |
| UOOYW |
Milled
adapter for UXOOR bellows with screwmount lenses |
1954 |
| UOOZK |
Adapter
to use the 90/2 Summicron on the UXOOR bellows |
1960 |
Source:
'The Leica Collectors Guide 1925 -1960', cmpiled by D.R. Grossmark, Hove Camera
Foto Books: 1976.
There
were also a number of lens shades and masks made available for the UXOOR between
1951 and 1960, i'll leave listing those for now, if you are truly in need
of this information, please let me know. Combining this information with a
1973 Leica catalogue, i'm hoping to merge the information based on the graphical
depiction with the numerical codes.
UOOND/16596
|
Bayonet:
35 and 50
50:
1.4:1 - 3.2:1
35: 2.1:1 - 4.7:1
Note:
Bayonet lenses provide greater magnification.
|
| UOOYW/16590 |
Screwmount:
35 and 50
50: 1.1:1 - 3:1
35: 1.7:1 - 4.3:1
REPRO-PHOAR and REPRO-SUMMAR 24/4.5: 3.6:1 - 7:1
Note: Instead of using this adapter, you can use an LTM to
Bayonet adapter and just use the UOOND/16596
|
| UOORF/17672 |
For
the Bayonet Summicron 50: 1.4:1 - 3.2:1 |
| UOOZK/16598 |
Summicron
90/2: 1:9 - 1:1.2
Elmarit 135: 1:18.5 - 1:1.32
Telyt 200/4: Infinity to 1:3
Telyt 280/4.8: Infinity to 1:6
|
|
16558
(Was originally supplied with the bellows)
|
Tele-Elmar
135: Infinity to 1:1.3
(Matheson says Infinity to 0.77)
Elmar and Elmarit 90/2.8 and f4: Infinity to 1:1
Elmar 65 3.3 Infinity to 1.6:1
|
|
16556
(Replacement
part for the 16558)
|
Tele-Elmar
135: Infinity to 1:1.3
Elmar and Elmarit 90: Infinity to 1:1
Elmar 65: Infinity to 1.4:1
|
| UOOXI/16572 |
Hektor
125: Infinity to 0.65 |
|
16558
+ 16472
(The
16472 was discontinued according to Morgan and Morgan, pg. 272, 1973)
|
Hektor
and Elmar 135: Infinity to 0.75 |
Worthy
of note is the difference in the adapters 16558 and 16556 with regard to their
ratios. There is no difference insofar as their operation for the Tele-Elmar,
Elmar and Elmarit 90, with the exception of the Elmar 65. Another thing to
note, 35, 50, 65 and 125 Hektor lenses are fitted directly to their various
adapters and on to the bellows. As will be familiar to most Visoflex users,
only the lens heads from the other lenses are used in conjunction with adapters.
Other
screwmount and bayonet lenses can be used with the first two (UOOND and UOOYW)
adapters listed above, particularly longer focal lengths will give larger
magnifications if added directly to the adapter (up to 5:1), "...since
the normal lens mount also adds to the overall extension. On the other hand,
the complete assembly cannot be focused to infinity with lenses shorter than
the 65mm." (Matheson, pg. 368, 1972.)
The
Focusing Bellows
The
Model II bellows for Visoflexes II, IIa and III extend 9.5 cm. and are mounted
on a guide rail using a rack and pinion movement The side of the rail includes
a guide to magnification (1 to 0) that is for the 90mm lens (excluding the
Summicron 90) and a measuremnent for exposure factors. The other side of the
rail, in green, is a millimetre scale that runs from 0 to 95. One of the apparently
cool things about the bellows II is that you can use it with screwmount versions
of the Viso II. So yes, old Leicas really do never die, but I needn't have
told you that, right?
Operation
is quite complex to explain, so i'd suggest reading Matheson on page 368 of
his book on the Leica and Leicaflex. A quick praeces follows...
The
fixed scale of reproduction is for the 90mm lenses excluding the Summicron.
Using the Elmar or Elmarit provides the opportunity to use the scales provided
on the side of the bellows. Extending the front of the bellows so that the
white arrow on the back of the bellows indicates the scale of reproduction
on the left side (In Red) gives you all the indication you need to make a
shot with these lenses. For other lenses, use the green scale. Make the image
recognisable on the ground glass and then move the whole assembly forward
and backward by turning the right-hand knob. When the image is absolutely
sharp, push the locking lever forward. Alternatively, use the left-hand knob
for roughly adjusting the image and the right-hand knob for final focus.
To
move from horizontal to vertical shots, you can press the catch at the rear
of the bellows and move the assembly 90 degrees. To dismantle the assembly,
you should make sure the camera is in the horizontal position, otherwise you
may "foul" the front focusing movement of the bellows.
In
the next couple of weeks I hope to have a scan here of the tables that will
guide you through the scales of reproduction for the individual lenses on
the bellows II. However, I hope this is enough to get most people started
using the Leica and bellows. I should also note that depending on the author
of the information about the use of the bellows II, there does seem to be
a number of discrepancies with regard to the available ratios possible with
individual lenses. Unless otherwise noted, the ratios I have specified above
are from the January 1973 'Leica General Catalogue of Photographic Equipment
and Special Programme'.
As
always, i'm glad to hear from people who know more about this than I do. And
i'm not ashamed to admit--there's many.
All
the best,
Gary
Further
Reading
Andrew
Matheson, 'The Leica and Leicaflex Way: The Leica and Leicaflex Photographer's
Companion' [Focal Press: London and New York], 1972.
Heinrich
Stockler, 'The Leica in Professional Practice' [Fountain Press: London], 1954.
Morgan
and Morgan, 'Leica Manual: The Complete Book of 35mm Photography' [Morgan
& Morgan: New York], 1973.